Contents:
1. What’s L3 Agent?
2. Floating IPs
3. Security group
3.1. Demonstration
3.2. Ping to Instance
1. What’s L3 Agent?
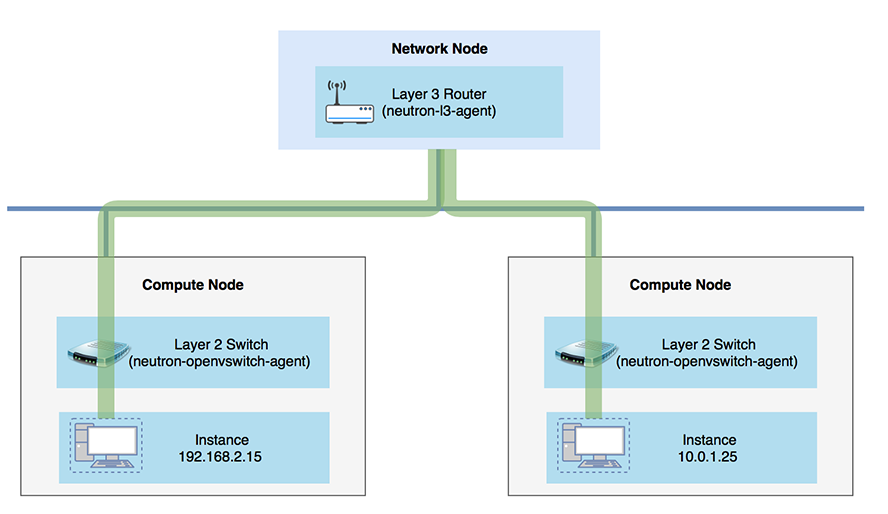
- Neutron-l3-agent: performs layer 3 routing between tenant private networks, the external network, and others
- Using Linux IP stack and iptables to perform L3 forwarding and NAT
- Using network namespace in the Linux kernel which supports overlapping IP address between tenants
- Creating routers that handle routing between directly-connected LAN interfaces (tenant networks, GRE or VLAN) and a single WAN interface (FLAT or VLAN provider network)
2. Floating IPs
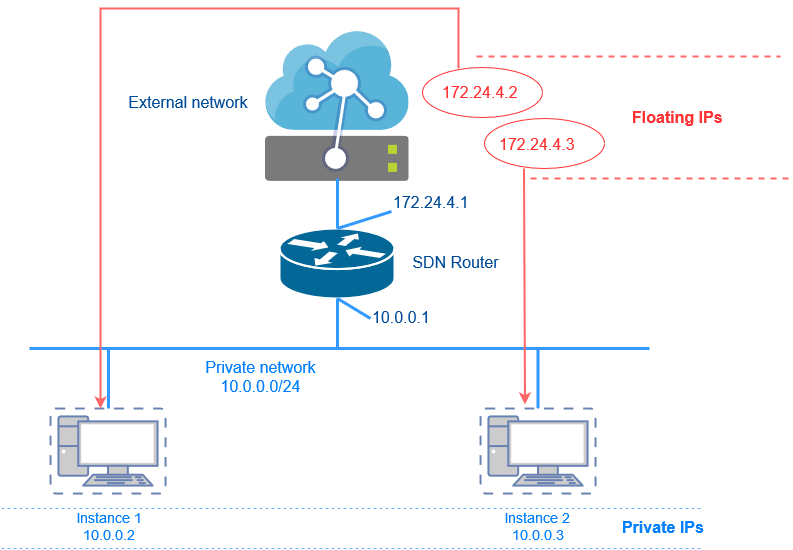
In the above figure, there are two instances: instance 1 and instance 2 and they have IP addresses that come from the private network (behind a NAT router). Everything that is behind the NAT router cannot be addressed directly so the 10.0.0.2 and 10.0.0.3 IP addresses cannot be accessed directly from the Internet.
That is why in OpenStack Software Defined Networking, to make instances accessible, these instances need to be allocated floating IP addresses.
Floating IPs are IP addresses are exposed at the external side of the NAT router which is the SDN router. So, for external traffic to reach instance 1 and instance 2, the external traffic would go directly to the floating IP addresses of the instances. In the above example, traffic arrives 172.24.4.2 and 172.24.4.3 will be forwarded to 10.0.0.2 and 10.0.0.3 respectively.
- Used for communication with networks outside the cloud, including the Internet
- A floating IP address and a private IP address can be used at the same time on a NIC (Network Interface Card)
- NOT automatically allocated to instances by default, they need to be attached to instances manually
3. Security group
In order to answer the question: What’s security group? Let make a demonstration.
3.1 Demonstration
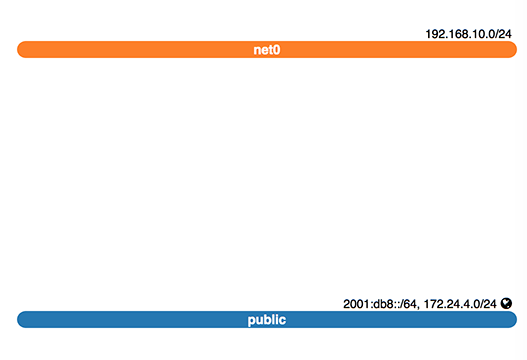
Create a network net0 with subnet subnet0
$ openstack network create --share net0

$ openstack subnet create subnet0 --gateway 192.168.10.1 --network net0 --subnet-range 192.168.10.0/24
Network toplogy:
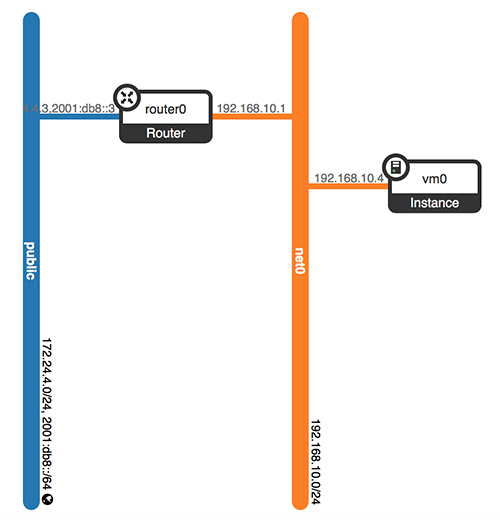
Create a router to make a connection between public network and the private network net0
$ openstack router create router0
Set gateway for router0 to tell OpenStack which network to use for Internet access
$ openstack router set router0 --external-gateway public
Attach router0 to subnet0 of private net0
$ openstack router add subnet router0 subnet0
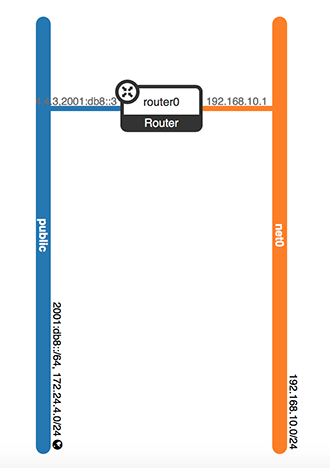
The connection is already made, 192.168.10.1 is IP address of internal interface of router:
Create a instance named vm0 and assign vm0 to the internal network net0
$ openstack server create vm0 --image cirros-0.3.5-x86_64-disk --flavor m1.tiny --network net0
Allocate a floating IP to tenant
$ openstack floating ip create public

+---------------------+--------------------------------------+
| Field               | Value                                |
+---------------------+--------------------------------------+
| created_at          | 2018-09-19T14:56:21Z                 |
| description         |                                      |
| dns_domain          | None                                 |
| dns_name            | None                                 |
| fixed_ip_address    | None                                 |
| floating_ip_address | 172.24.4.13                          |
| floating_network_id | 658fb01d-f4e6-4a36-aad4-542c61aca053 |
| id                  | e7d00ee8-adf4-4f6b-8345-5a30db06a311 |
| name                | 172.24.4.13                          |
| port_details        | None                                 |
| port_id             | None                                 |
| project_id          | 86bacea0e4e64f7ba4c21348fd33c318     |
| qos_policy_id       | None                                 |
| revision_number     | 0                                    |
| router_id           | None                                 |
| status              | DOWN                                 |
| subnet_id           | None                                 |
| tags                | []                                   |
| updated_at          | 2018-09-19T14:56:21Z                 |
+---------------------+--------------------------------------+
Make vm0 accessible through a floating ip address
$ openstack server add floating ip vm0 172.24.4.13
Network topology:
3.2 Ping to Instance
Openstack uses network namespace to implement Software Defined Networking
$ ip netns show

qrouter-ec69b7bd-b5e8-4031-9386-c179e0edff83
qdhcp-e46f4314-c796-4fe4-bfb0-a9ae3f8159b7
qrouter namespace is what is representing the router that has just been created in SDN. Host machine has IP adrress: 192.168.2.102 It’s impossible to ping directly to vm0 which has IP: 192.168.10.4
stack@stacker:~/devstack$ ping 192.168.10.4
PING 192.168.10.4 (192.168.10.4) 56(84) bytes of data.
^C
--- 192.168.10.4 ping statistics ---
6 packets transmitted, 0 received, 100% packet loss, time 5033ms
So, how to ping to vm0? Running command ‘ip a’ in namespace in qrouter namespace.
$ sudo ip netns exec qrouter-ec69b7bd-b5e8-4031-9386-c179e0edff83 ip a
The external network interface
18: qg-34b1c4c8-cc: <BROADCAST,MULTICAST,UP,LOWER_UP> mtu 1500 qdisc noqueue state UNKNOWN group default qlen 1
    link/ether fa:16:3e:f7:16:b4 brd ff:ff:ff:ff:ff:ff
    inet 172.24.4.3/24 brd 172.24.4.255 scope global qg-34b1c4c8-cc
       valid_lft forever preferred_lft forever
    inet 172.24.4.13/32 brd 172.24.4.13 scope global qg-34b1c4c8-cc
       valid_lft forever preferred_lft forever
    inet6 2001:db8::3/64 scope global
       valid_lft forever preferred_lft forever
    inet6 fe80::f816:3eff:fef7:16b4/64 scope link
       valid_lft forever preferred_lft forever
The router interface (the internal network interface)
19: qr-d0316e9e-f5: <BROADCAST,MULTICAST,UP,LOWER_UP> mtu 1450 qdisc noqueue state UNKNOWN group default qlen 1
    link/ether fa:16:3e:bb:51:66 brd ff:ff:ff:ff:ff:ff
    inet 192.168.10.1/24 brd 192.168.10.255 scope global qr-d0316e9e-f5
       valid_lft forever preferred_lft forever
    inet6 fe80::f816:3eff:febb:5166/64 scope link
       valid_lft forever preferred_lft forever
Now, the instance vm0 has been ready for ping, yet?!
$ sudo ip netns exec qrouter-ec69b7bd-b5e8-4031-9386-c179e0edff83 ping 192.168.10.4
PING 192.168.10.4 (192.168.10.4) 56(84) bytes of data.
^C
--- 192.168.10.4 ping statistics ---
3 packets transmitted, 0 received, 100% packet loss, time 1999ms
=> The instance vm0 still be NOT pingable due to firewall rules.
Security group
- Sets of IP filter rules that are applied to all project instances
- Define networking access to the instance
- All projects have a default security group: denies all incomming traffic and allows only outgoing traffic to instance
=> In order to ping to instance vm0 in the previous demo, the default Security Group must be modified or create the new Security Group to allow incoming traffic.
Create a security group
$ openstack security group create mysc --description "Allow outcoming traffic"
Create a rule to allow ALL ICMP Ingress
$ openstack security group rule create mysc --ingress --protocol icmp --remote-ip 0.0.0.0/0
Add security group mysc to instance vm0
$ openstack server add security group vm0 mysc
Now, the instance vm0 has been ready for ping
$ sudo ip netns exec qrouter-ec69b7bd-b5e8-4031-9386-c179e0edff83 ping 192.168.10.4
PING 192.168.10.4 (192.168.10.4) 56(84) bytes of data.
64 bytes from 192.168.10.4: icmp_seq=1 ttl=64 time=3.61 ms
64 bytes from 192.168.10.4: icmp_seq=2 ttl=64 time=0.739 ms
64 bytes from 192.168.10.4: icmp_seq=3 ttl=64 time=0.507 ms
^C
--- 192.168.10.4 ping statistics ---
3 packets transmitted, 3 received, 0% packet loss, time 2003ms
rtt min/avg/max/mdev = 0.507/1.619/3.612/1.412 ms
